Liferay 6 with private Java on shared server install is simple as you will see below. Yet Liferay comes with many features and thus needs quite much RAM. Your other option is a VPS but there you need to care for memory for all running components. We show 2 Liferay hosting scenarios below.
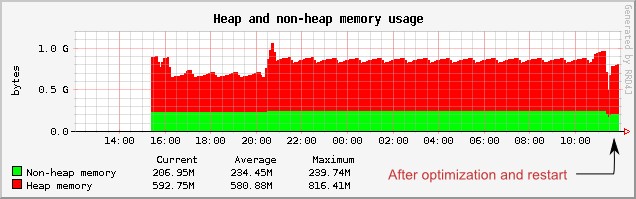
If you want to have all typical shared server services like cPanel, FTP, mail, SQL and private JVM with Tomcat and Liferay use our Java hosting Tomcat Pro package (1GB heap). As per its developers this amount of RAM ‘is perfectly reasonable for a moderately sized machine or a developer machine’. Here comes idle Liferay JVM memory usage graph:
If you want to manage your own server then get a VPS package where we will optionally preinstall Java, application server, SQL database, Liferay and other software for you. You can also perform the installs by yourself. Liferay on a VPS will be described later in this article. Liferay can also run on Jetty, JBoss and Glassfish if you prefer any of these application servers.
This is copy and paste style tutorial. We are using liferay-portal-tomcat bundle here as it allows for fastest installation. We will use currently newest Liferay 6.2 GA3.
Private Liferay in cPanel environment (private Java on shared server)
As liferay-portal-tomcat-6.2.0-ce-ga1-20131101192857659.zip is based on Tomcat 7.0.42, please first make sure your Tomcat version is set to 7.0.42 in Java Control panel (change it if necessary and relogin to SSH if you are currently logged in).
Get the Tomcat Lifreray bundle, unzip it and move to a temporary directory with a short name
wget http://optimate.dl.sourceforge.net/project/lportal/Liferay%20Portal/6.2.0%20GA1/liferay-portal-tomcat-6.2.0-ce-ga1-20131101192857659.zip
unzip liferay-portal-tomcat-6.2.0-ce-ga1-20131101192857659.zip
mv liferay-portal-6.2.0-ce-ga1/tomcat-7.0.42 tomcat
mysql-connector-java-5.1.23-bin.jar (mysql.jar) is already included in bundeled Tomcat’s lib/ext directory so there’s no need to add it.
Reset setenv.sh to not include parameters provided by our environment and controlled by Java Control Panel
echo 'CATALINA_OPTS="$CATALINA_OPTS -Dfile.encoding=UTF8 -Djava.net.preferIPv4Stack=true -Dorg.apache.catalina.loader.WebappClassLoader.ENABLE_CLEAR_REFERENCES=false"' > tomcat/bin/setenv.shCopy server.xml and tomcat-users.xml from your existing Tomcat (created by Java Control Panel). This will ensure your Liferay Tomcat will use correct ports and Tomcat Manager/Admin access will work as expected. Also set connectors to use UTF-8 encoding.
cp ~/appservers/apache-tomcat-7.0.42/conf/server.xml ~/tomcat/conf
cp ~/appservers/apache-tomcat-7.0.42/conf/tomcat-users.xml ~/tomcat/conf
sed -i.bak 's/<Connector /<Connector URIEncoding="UTF-8" /g' ~/tomcat/conf/server.xml
Stop and replace our Tomcat with Liferay’s Tomcat. Also cleanup the temporary directory.
jk
rm -rf ~/appservers/apache-tomcat-7.0.42
mv ~/tomcat ~/appservers/apache-tomcat-7.0.42
rm -rf ~/tomcat
Start new Tomcat and access Liferay Wizard at your domain or alias root URL. We will need to configure MySQL database there. Optionally (later) you can set local or remote email account that will be used for sending email. If you do not configure outgoing email, Liferay will send email using its internal mechanism.
[email protected] [~]# js
Using CATALINA_BASE: /home/user/appservers/apache-tomcat-7.0.42
Using CATALINA_HOME: /home/user/appservers/apache-tomcat-7.0.42
Using CATALINA_TMPDIR: /home/user/appservers/apache-tomcat-7.0.42/temp
Using JRE_HOME: /opt/jdk1.7.0_45
Using CLASSPATH: /home/user/appservers/apache-tomcat-7.0.42/bin/bootstrap.jar:/home/liferayj/appservers/apache-tomcat-7.0.42/bin/tomcat-juli.jar
Using CATALINA_PID: /home/user/.catalina.pid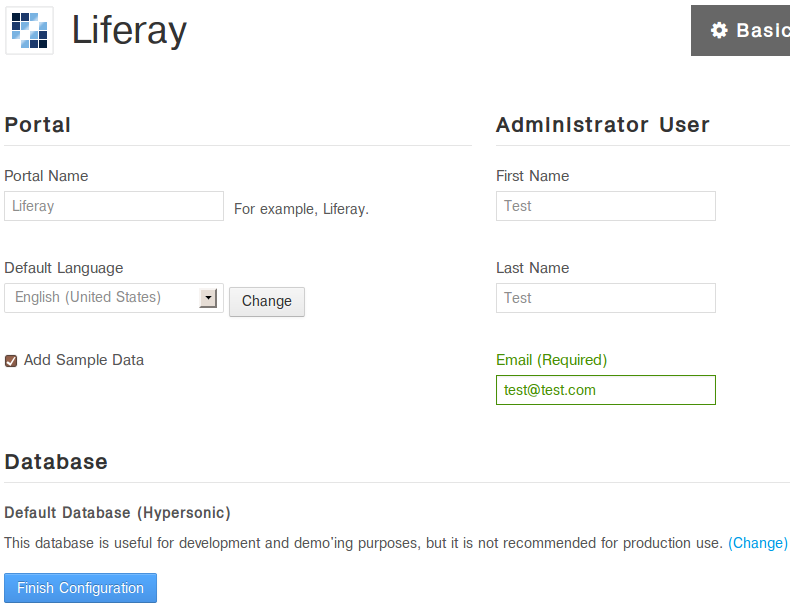
On the Wizard screen click Change besides Default Database (Hypersonic) as we will use MySQL. Login to your cPanel and create new MySQL database user_lportal, new database user user_lportal and assign one to the other with all privileges. In real scenario user_ prefix will contain your hosting username.
Use the database credentials in the form. JDBC URL will look similar to (again replace user with your hosting username):
jdbc:mysql://localhost/user_lportal?useUnicode=true&characterEncoding=UTF-8&useFastDateParsing=false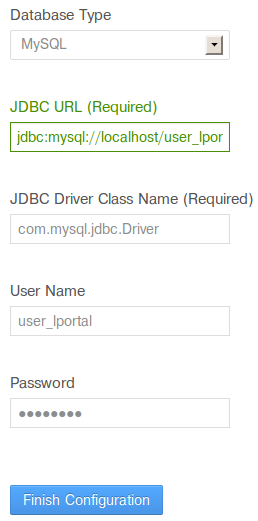
Click Finish Configuration. You will see Liferay is being installed. This may take a few minutes. And next message will be Your configuration was saved successfully. The configuration was saved in /home/user/appservers/portal-setup-wizard.properties.
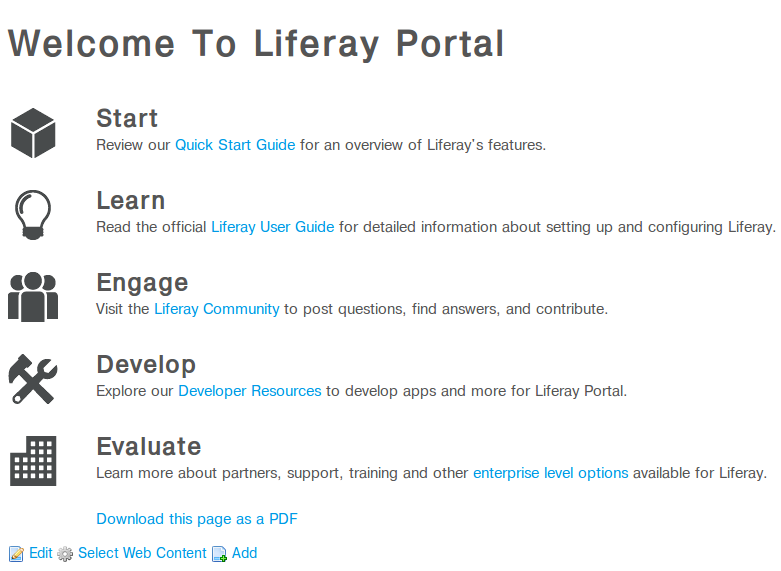
Go to the Portal, read and accept Usage Terms, change password, set password hint and you are set. Now you may finetune and configure the portal by following the guides Review our Quick Start Guide for an overview of Liferay’s features and Read the official Liferay User Guide for detailed information about setting up and configuring Liferay referenced on main portal page.
Liferay Performance Tuning
Liferay was never a master of speed. It’s user friendliness requires processing power and resources. You carefully should read https://dev.liferay.com/discover/portal/-/knowledge_base/6-1/performance-tuning?notice=1 and apply any tweaks possible.
Common tweaks that can improve performance are:
increase JVM memory limit especially if you see memory usage nears it or you see high activity of JVM Garbage Collector. You can view memory usage directly in portal or use our Java Control Panel graphs or connect with a monitoring tool like jconsole or jvisualvm. Contact us for advice and quote for the upgrade.
- add Garbage Collector flags in your
setenv.sh(by appending to initial CATALINA_OPTS settings):
echo 'CATALINA_OPTS="$CATALINA_OPTS -Dfile.encoding=UTF8 -Djava.net.preferIPv4Stack=true -Dorg.apache.catalina.loader.WebappClassLoader.ENABLE_CLEAR_REFERENCES=false -XX:+UseParNewGC -XX:+UseConcMarkSweepGC -XX:+CMSParallelRemarkEnabled -XX:SurvivorRatio=20 -XX:ParallelGCThreads=8"' > $CATALINA_HOME/bin/setenv.sh- when in production mode, create/update
webapps/ROOT/WEB-INF/classes/portal-ext.propertieswith the following content:
cat >> $CATALINA_HOME/webapps/ROOT/WEB-INF/classes/portal-ext.properties<<EOF
last.modified.check=false
theme.css.fast.load=true
theme.images.fast.load=true
javascript.fast.load=true
index.on.startup=false
EOF- disable unused servlet filters. For the beginning try disabling the following ones:
cat >> $CATALINA_HOME/webapps/ROOT/WEB-INF/classes/portal-ext.properties<<EOF
com.liferay.portal.servlet.filters.sso.opensso.OpenSSOFilter=false
com.liferay.portal.servlet.filters.sso.cas.CASFilter=false
com.liferay.portal.servlet.filters.sso.ntlm.NtlmPostFilter=false
com.liferay.portal.servlet.filters.sso.ntlm.NtlmFilter=false
com.liferay.portal.sharepoint.SharepointFilter=false
com.liferay.portal.servlet.filters.gzip.GZipFilter=false
EOF
You can extract filter list from portal.properties with:
unzip -c $CATALINA_HOME//webapps/ROOT/WEB-INF/lib/portal-impl.jar portal.properties | grep com.liferay.portal.servlet.filtersremove uneeded portlets from
webappsenable Tomcat APR native library. It is enabled by default but recheck in Java Control Panel to be sure. In Tomcat log you should see a line similar to INFO: Loaded APR based Apache Tomcat Native library 1.1.27 using APR version 1.4.6.
Liferay in VPS environment
In this kind of hosting you get Java, application server, database and any requested software preinstalled but you need to ensure the VPS RAM size ordered is enough to hold all running components. This is different from shared Java hosting where you only care for JVM heap and PermGen limits.
Install instructions to come…