3 simple steps (prepare DB, update DB credentials, upload WAR) explained in detail to have your web application (WAR) deployed and made accessible on our shared hosting servers.
For our guide we will use database based, WAR packaged application. It will be simple Struts/Hibernate application. On local development host we are using database name ‘db1’, database user ‘root’ and WAR file name webapp.war.
Prepare database
Most of you are creating database driven applications. Unless you use a standalone database like SQLite or HSQL you will need to create MySQL or PostgreSQL database on the hosting server. This is done in cPanel’s Databases section.
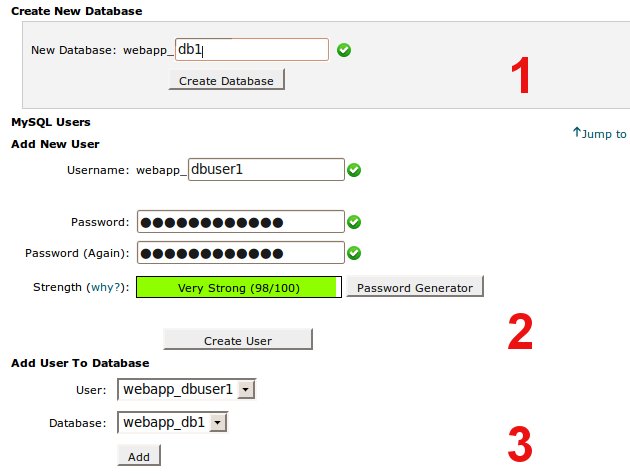
There are 3 steps when preparing a database. Users sometimes forget about the third one.
1) Create a database (its name will always begin with your username_ prefix)
2) Create a database user (also with preset username_ prefix)
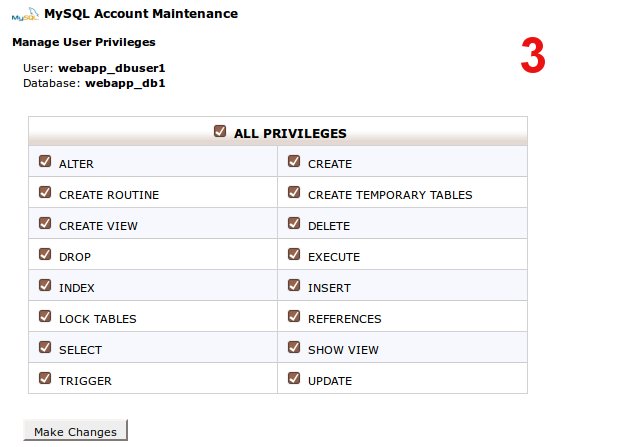
3) Assign database user to a database with all or selected privileges (privileges are not being selected in case of PostgreSQL)
These of you who are going to access the database remotely should also enable remote access in cPanel in Databases > Remote MySQL section. PostgreSQL users will need SSH tunnel setup first to connect remotely e.g. with PgAdminIII but remote access is not needed for connecting from webapp running on the same host (you use localhost in JDBC URL).
Now you can optionally upload database dump (say you have it in dump.sql file) to populate your database. Your options are:
- Upolad dump.sql with SCP or FTP, then login with SSH and run
mysql -u dbuser -p dbname < dump.sqlor (for PostgreSQL)
pgsql -U dbuser dbname < dump.sql- Upload remotely from a linux machine
mysql -h X.X.X.X -u dbuser -p dbname < dump.sqlor
pgsql -h X.X.X.X -U dbuser dbname < dump.sqlConnect remotely with a GUI client like MySQL Workbench and upload the dump. For PostgreSQL database you may use PgAdminIII but you will need to setup SSH tunnel first. Look for remote access with PgAdminIII/SSH tunnel article on our site (Articles section).
[for small dumps] Use phpMyAdmin or phpPgAdmin to upload the dump.
Some applications are creating databases on the fly at first run given proper credentials have been set in their configuration files (e.g. Cyclos).
Update database credentials in your webapp
Now it’s time to update your application with the new credentials that usually differ from those you used on your development host. For our example application we will update JDBC string stored in our local application’s WEB-INF/classes/hibernate.cfg.xml. We can do it manually or with our IDE.
<property name="connection.url">
 jdbc:mysql://localhost:3306/webapp_db1
</property>
<property name="connection.username">webapp_dbuser1</property>
<property name="connection.password">DBUSER1_PASSWORD_HERE</property>
Then we need to regenerate the WAR to include new hibernate.cfg (from an IDE like Eclipse or manually). If we chose manual edit above then to create WAR we can go to application directory (where WEB-INF resides) and run
jar -cvf ../webapp.war *In Windows use backslash. This will create the WAR in parent directory.
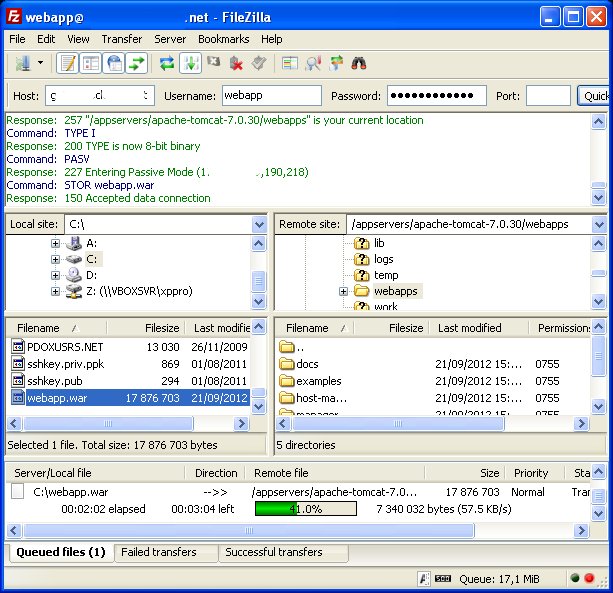
Upload webapp/WAR
We can now upload it upload it to /home/USERNAME/appservers/apache-tomcat-X.X.X/webapps directory (in case of Tomcat).
This can be done with:
1) FTP (e.g. Filezilla)
2) SCP (encrypted transfer - require key generation)
3) Tomcat Manager (smaller WARs)
4) cPanel’s File Manager (smaller WARs)
If your Tomcat was up while you were uploading you may see
java.lang.IllegalArgumentException: Invalid or unreadable WAR file : error in opening zip filein catalina.out as Tomcat tried to deploy partially uploaded WAR. Anyway at the end of log you should see something like
INFO: Deploying web application archive /home/webapp/appservers/apache-tomcat-7.0.30/webapps/webapp.warIf all went well, after a few seconds you will be able to access your app at http://yourdomain.com/webapp.
What if you want your webapp to be accessible at root URL http://yourdomain.com/ instead of http://yourdomain.com/webapp?
Two common options are:
1) Login with SSH, stop Tomcat, rename your webapp.war to ROOT.war (case sensitive, can be done with FTP, SCP, cPanel file manager), start Tomcat. The steps can also be done without SSH, using Java Control Panel and cPanel only.
2) In Server section of conf/server.xml add new default context with path="" and docBase="yourwarname". In our example it would be docBase="webapp".
Troubleshooting
Check Tomcat logs if your app does not work as expected. You may check them with:
- Java Control Panel
- Login via SSH and use command line viewers/editors: less, nano, mcedit, vim, …
- Logs can also be downloaded with cPanel’s File Manager or SCP client (e.g. WinSCP)
If you cannot make your app running by yourself contact our support department. We will help with pleasure.
Starting and stopping Tomcat (the most common appserver management action):
- Use Java Control Panel Restart or Stop/Start buttons.
- Login with SSH, then you can run following shortcut commands:
js (to start)
jk (to stop)
jr (to restart)
For example:
webapp@localhost [~]# jr
restarting jvm: .killed
Using CATALINA_BASE: /home/webapp/appservers/apache-tomcat-7.0.30
Using CATALINA_HOME: /home/webapp/appservers/apache-tomcat-7.0.30
Using CATALINA_TMPDIR: /home/webapp/appservers/apache-tomcat-7.0.30/temp
Using JRE_HOME: /opt/jdk1.6.0_35
Using CLASSPATH: /home/webapp/appservers/apache-tomcat-7.0.30/bin/bootstrap.jar:/home/webapp/appservers/apache-tomcat-7.0.30/bin/tomcat-juli.jar