JBoss 7 allows for easy hosting of multiple domains with each of them serving different web application in arbitrary context. Here we show how to do it with JBoss 7. Check out other articles for similar tutorials for Tomcat, Glassfish and Jetty.
As a starting point we have http://jboss7.jvmhost.net/ opens JBoss 7 welcome page with link to Administration console. If your JBoss runs on shared hosting server the console URL will include custom port. As we have pristine JBoss installation in our example, first we need to setup admin user and allow remote connections.
In this scenario our primary domain is jboss7.jvmhost.net. We want 2 sample web applications (which are modified sample.war from Tomcat project) be available at root URLs as below:
jboss7.jvmhost.net -> jboss1.war
jboss72.jvmhost.net -> jboss2.war
1. Additional domain setup
Add the second domain in cPanel as Addon domain and map it to your JBoss in Java Control Panel - Mappings. Click Restore Default Mappings. If you are not using Apache as frotend just make sure the second domain points to your VPS IP (the same IP the application server listens on).
2. JBoss deployment desciptors
Make sure correct jboss-web.xml is included in WEB-INF of each WAR so that JBoss correctly assigns the applications to virtual servers and sets them at root URL. In jboss1.war’s WEB-INF/jboss-web.xml we set:
<?xml version="1.0" encoding="UTF-8"?>
<jboss-web xmlns="http://www.jboss.com/xml/ns/javaee".
 xmlns:xsi="http://www.w3.org/2001/XMLSchema-instance".
 xsi:schemaLocation="http://www.jboss.com/xml/ns/javaee http://www.jboss.org/j2ee/schema/jboss-web_5_1.xsd">
 <context-root>/</context-root>
</jboss-web>
This will assign the application to default-host at root URL. Similarly jboss2.war’s WEB-INF/jboss-web.xml will contain:
<?xml version="1.0" encoding="UTF-8"?>
<jboss-web xmlns="http://www.jboss.com/xml/ns/javaee".
 xmlns:xsi="http://www.w3.org/2001/XMLSchema-instance".
 xsi:schemaLocation="http://www.jboss.com/xml/ns/javaee http://www.jboss.org/j2ee/schema/jboss-web_5_1.xsd">
<virtual-host>jboss72</virtual-host>
<context-root>/</context-root>
</jboss-web>
This will assign the web application to virtual host jboss72 at root URL.
3. Disable enable-welcome-root in standalone.xml
Change true to false in standalone.xml
<virtual-server name="default-host" enable-welcome-root="false">so that our default virtual host uses root application defined by our jboss-web.xml. Otherwise you would get:
Caused by: java.lang.IllegalArgumentException: Child container with name already exists which means the default root context conflicts with root context from our web application.In case you try to set custom default module (its default value is ROOT.war) and the enable-welcome-root="true" you would get an other error:
JBAS018010: A default web module can not be specified when the welcome root has been enabled4. Deploy first web application
Copy jboss1.war to ~/appservers/jboss-as-7.1.1.Final/standalone/deployments. jboss1.war.deployed will show up in the directory in a moment. Copying jboss2.war now would result in an error as the required virtual host is not yet defined. http://jboss7.jvmhost.net/ will now work and show message from jboss1.war.
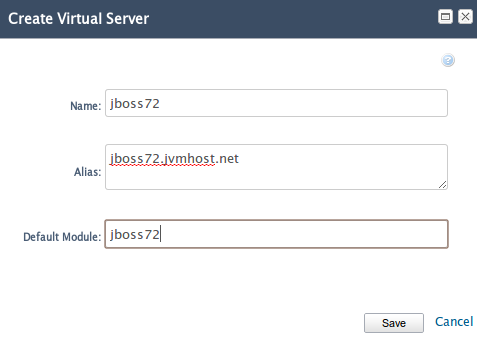
5. Create new virtual server for the additional domain
In JBoss console go to Profile tab, choose Web - Servlet/HTTP - Virtual Servers and click Add. Set Name (use the same identifier as in jboss-web.xml) and domain where you want the application to be accessible at. The default module identifier is not important.
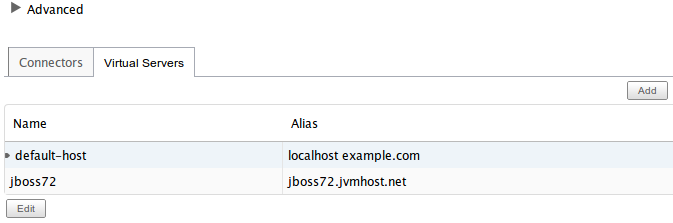
Your virtual servers list will look like this:
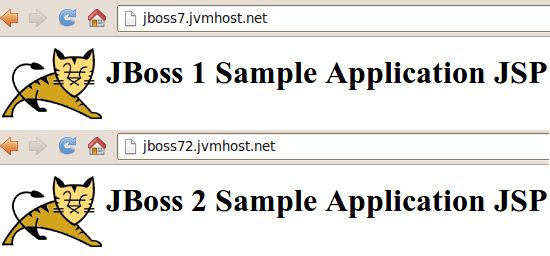
6. Deploy second web application
Copy jboss2.war into ~/appservers/jboss-as-7.1.1.Final/standalone/deployments. jboss2.war.deployed will show up in the directory in a moment. Access the additional domain to verify jboss2.war content is served like on the below screenshot.
That’s all. You now have 2 different web applications bound to root URL of 2 different domains. You can reuse this procedure to server more webapp/domain sets.
7. Setting up JBoss admin user for remote access
[~]# add-user.sh
What type of user do you wish to add?
a) Management User (mgmt-users.properties)
b) Application User (application-users.properties)
(a): a

Enter the details of the new user to add.
Realm (ManagementRealm) :
Username : jadmin
Password : SECRET
Re-enter Password : SECRET
About to add user 'jadmin' for realm 'ManagementRealm'
Is this correct yes/no? yes
Added user 'jadmin' to file '/home/jboss/appservers/jboss-as-7.1.1.Final/standalone/configuration/mgmt-users.properties'
Added user 'jadmin' to file '/home/jboss/appservers/jboss-as-7.1.1.Final/domain/configuration/mgmt-users.properties'
8. Multiple cPanel accounts using single JBoss instance
In above example we used single cPanel account with addon domain. In case you run your own cPanel based dedicated server or VPS you can have JBoss runing on a dedciated cPanel account and proxy domains from any other account to it. You can use mod_proxy, mod_proxy_ajp and mod_jk. AJP will require enabling it in standalone.xml. This can be done by adding the line
<connector name="ajp" protocol="AJP/1.3" socket-binding="ajp" enabled="true" scheme="ajp"/>just beside
<connector name="http" protocol="HTTP/1.1" socket-binding="http" scheme="http"/>.All accounts and/or domains can be proxied to application server using cPanel’s include mechanism. For example by creating /etc/httpd/conf/userdata/std/2/jboss/domain.com/proxy.conf and placing there:
ProxyPreserveHost On
ProxyPass /cpanel !
ProxyPass / http://localhost:YOURAPSERVERHTTPPORT/
ProxyPassReverse / http://localhost:YOURAPSERVERHTTPPORT/
The above example is for mod_proxy but can be easily changed for mod_proxy_ajp or mod_jk. Feel free to add comments or questions that we will try to address.