Grails is a very popular Groovy/Java framework amongst Java developers worldwide. We, at JVM Host can see increasing interest in Grails hosting too. In this tutorial we will show you how you can build and host a simple database driven Grails project with our Tomcat Plus 128MB heap package.
Grails - what it is and features
Grails is an open source web application framework which uses the Groovy programming language (which is in turn based on the Java platform). It is intended to be a high-productivity framework by following the coding by convention paradigm, providing a stand-alone development environment and hiding much of the configuration details from the developer.
Grails framework is based on Java, Groovy Spring and GORM (Grails' Object Relational Mapping). The most important characteristics highlighted on Grails website are:
- Rapid - Have your next Web 2.0 project done in weeks instead of months. Grails delivers a new age of Java web application productivity.
- Dynamic - Get instant feedback, see instant results. Grails is the premier dynamic language web framework for the JVM.
- Robust - Powered by Spring, Grails out performs the competion. Dynamic, agile web development without compromises.
- Based on proven technologies - Java, Groovy, Spring, GORM
Other features include: Scaffolding i.e. building CRUD methods and views dynamically, Plugin capabilities: GWT, DWR, YUI, ACEGI, Google AppEngine, Google Wave, COMET, JQuery, Clojure, Scala, JSF, Struts..., Support for all modern browsers, Object rendering to JSON or XML, MVC, IoC
As of November 2011 current stable version is 1.3.7 and development one is 2.0.0.RC1.
Preparing developer environment
As this is a tiny project we will develop it directly on JVM Host Java hosting server. You will surely prefer to develop your advanced projects locally using an IDE like Eclipse. After you order Tomcat Plus or higher package and receive account details you are almost ready to go with building your first application. 128 MB of heap memory provided with the package is enough for many applications (as we as a Grails host can see), yet you can upgrade heap memory whenever you need. Login to cPanel and JCP panels to familiarize as you will need them later.
After logging in to your account via SSH (use Putty on Windows) you are dropped to shell. Here JAVA_HOME is already set. You can change JDK version via JCP if you want. You need to make sure the Tomcat is down, download Grails from their website to home directory and unpack it, create symbolic link, modify PATH variable and add GRAILS_HOME to ~/.bashrc file.
cd
jk
unzip grails-1.3.7.zip
ln -s grails-1.3.7 grails
echo -e '\nexport GRAILS_HOME=~/grails' >> .bashrc
echo 'export PATH=$GRAILS_HOME/bin:$PATH' >> .bashrc
Now read-in the new settings into your current environment and check if grails replies:
source ~/.bashrc
grails
It should make some preliminary checks, download some jar files and print available command list.
Building simple database application
Now we are ready to make a few calls to Grails and end up with a ready to deploy application in WAR archive. Grails comes with embedded Tomcat 6 server but we will use Tomcat 7 running on our dedicated JVM to deploy the WAR in a moment.
grails create-app employeesIt will create employees project directory and populate it with application skeleton.
Creating a model
The core of most Grails applications is the domain model (model like in MVC), which represents the persistent data of the application. The model (or domain) will be mapped to a database table using GORM. Thus creating some persistent data is as simple as creating a new domain class:
cd employees
grails create-domain-class org.example.Employee
You can print the newly created file containg the class with:
cat grails-app/domain/org/example/Employee.groovy

package org.example
class Employee {
      static constraints = {
      }
}
Let's add some properties to our class. The properties will be mapped to table columns.
package org.example
class Employee {
        String name
        String born
        static constraints = {
            name(blank: false)
            born(blank: false)
        }
}
After saving instance of the class at runtime the properties will be saved to related table in database. Tables and columns will be automatically created unless they already exist. The constaints property allows for specifying validation rules.
Time for a controller
We need a controller to handle web requests that come from a browser and generate your user interface. Usually 1 controller handles single URL.
grails create-controller org.example.Employee
cat grails-app/controllers/org/example/EmployeeController.groovy

package org.example
class EmployeeController {
      def index = { }
}
Thanks to scaffolding we can easily equip the controller with Create, Read, Modify (Update) and Delete actions also known as CRUD. Edit the above file so that it reads:
package org.example

class EmployeeController {
     def scaffold = Employee
}
Start the application with:
grails -Dserver.port=10735 run-appif you happen to get
Could not create disk store. Initial cause was
/tmp/org.hibernate.cache.UpdateTimestampsCache.data (Permission denied)
then probably you are trying to write to the file when it is already owned by another user. Run it this way:
grails -Dserver.port=10735 -Djava.io.tmpdir=tmp run-appIt will use ~/employees/tmp as temporary directory. 10735 is your HTTP port as specified in JCP control panel. Also set mapping mode to mod_proxy in JCP. This will allow your alias (e.g. grails.jvmhost.net) to be proxied to the just started embedded Tomcat server wihout a need to specify port in URL. Later, when you have WAR ready you will revert to mod_proxy_ajp. Now open the site replacing localhost with your alias, for example: http://grails.jvmhost.net/employees/ and click the controller - there you can test Create, Modify and Delete actions. Stop the server with Ctrl+C keys.
Persistent data source
As the data you entered are already gone forever we will now add persistent MySQL storage. Login to cPanel and create database, database user and assign the user to the database with all privileges. Then edit ~/employees/grails-app/conf/DataSource.groovy and make the production dataSource read:
production {
     dataSource {
        dbCreate = "update"
        driverClassName = "com.mysql.jdbc.Driver"
        url = "jdbc:mysql://localhost/grails_employees"
        username = "grails_employees"
        password = "pas5W0rd"
     }
}
Uncomment the below 2 lines in ~/employees/grails-app/conf/BuildConfig.groovy to enable remote dependency resolution. This way - at application startup - the required MySQL JDBC driver will be downloaded from a repository to ~/.ivy2/cache/mysql/mysql-connector-java/jars directory if missing.
repositories {
    ...
    mavenCentral()
    ...
}
dependencies {
    ...
    runtime 'mysql:mysql-connector-java:5.1.13
    ...
}
Start the application again - this time with production mode data source by specifying prod in command line. If the JDBC driver was not in place you will see download related messages.
grails -Dserver.port=10735 -Djava.io.tmpdir=tmp prod run-appNow enter some data, stop the server with Ctrl+C and start it again. The data should be preserved. If you connect to the MySQL server with a client software (e.g. MySQL Workbench or command line mysql) you can see that employee table has been automatically created and your data are there:
mysql> use grails_employees;
mysql> show tables;
+-----------------------+
| Tables_in_grails_employees |
+-----------------------+
| employee              |
+-----------------------+

mysql> select * from employee;
+----+---------+------------+----------+
| id | version | born       | name     |
+----+---------+------------+----------+
|  2 |       1 | 20.12.2012 | John Doe |
+----+---------+------------+----------+
Where is the view?
Remember we set def scaffold = Employee in the controller? This enabled dynamic scaffolding and also views and controller actions (methods) were automatically generated. If we want to customize views we need to generate views and CRUD methods with:
grails generate-controller org.example.EmployeeThis will ask for overwriting our somewhat simplistic EmployeeController.groovy. Now let's also generate our view files:
grails -Djava.io.tmpdir=tmp generate-views org.example.EmployeeWe now have the CRUD views in ~/employees/grails-app/views/employee directory as .gsp files. GSP are standard HTML code mixed with Groovy. Let's modify a line in ~/employees/grails-app/views/employee/create.gsp by adding an exclamation mark after header text so that it reads:
<h1><g:message code="default.create.label" args="[entityName]" />!</h1>Start the app and check if your customization is displayed.
Preparing WAR archive file
With the below command the default data source is production so we don't have to specify it in command line like before:
grails warNow let's change back proxy mode to mod_proxy_ajp (or mod_jk) in JCP panel as now our domain or alias will be redirecting to our standalone 128MB Tomcat with AJP protocol and start the Tomcat. If there were no errors reported copy the WAR to ~/appservers/apache-tomcat-7.0.22/webapps
rm -rf ~/appservers/apache-tomcat-7.0.22/webapps/ROOT
cp ~/employees/target/employees-0.1.war ~/appservers/apache-tomcat-7.0.22/webapps/ROOT.war
We rename it to ROOT.war to ease access at root URL - other method is to set Context path and docBase in Tomcat's server.xml. After a few seconds the application will be available at root URL of your alias or domain e.g. http://grails.jvmhost.com/ Wow, it works! :)
Grails Hosting environment
Tomcat Plus with 128 MB of heap memory is enough for many Grails based applications. We only sell dedicated JVM to make sure all the heap will be reserved for your application. With shared JVM your application perfrmance is affected by other user aplications and also host may force you to upgrade to dedicated JVM if it finds your app too resource hungry. Let's now enable JMX in JVMCP and restart our Tomcat, then connect with Jconsole to see initial memory usage. See your JMX port in JVMCP and run locally:
jconsole grails.jvmhost.net:30511Tomcat has around 7000 classed loaded, uses 61 MB of non-heap memory and heap memory usage fluctuates between 57 and 75 MB with idle application. Because memory usage of an active application will grow, we recommend the 128MB heap Tomcat Plus package of JVM Host. If your application requires more heap memory, you can upgrade it in 64MB chunks or decide on hosting your Grails application on 1 of our Xen VPS packages. See example graph in our custom JVMCP panel:
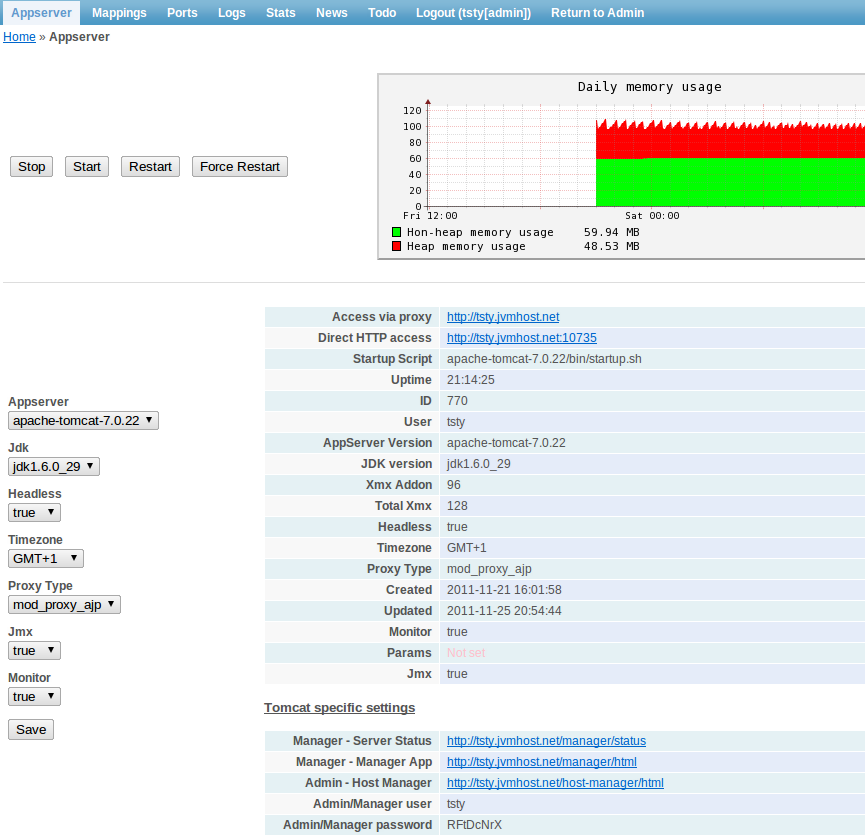
As you can see hosting side is as easy as it should be, drop in the WAR and access your new site.