OpenGTS is most popular Java based GPS data processing software. We offer OpenGTS hosting with our Tomcat package (private JVM on cPanel equipped shared server) or any of our VPS packages. Here goes a quick tutorial for running OpenGTS in our Java hosting environment.
This is copy&paste style tutorial. Please replace example values with your own before running a command where necessary.
About OpenGTS
OpenGTS (Open Source GPS Tracking System) is providing web-based service for querying and viewing GPS related data. It can operate independently of any specific GPS tracking device or protocol and comes with support for different protocol formats like OpenDMTP (Open Source Device Monitoring and Tracking Protocol). OpenGTS is fully written in Java and should run fine on any system that fully supports private JVM environment and an SQL database server (like MySQL).
Most important features include:
- Web-based authentication - single account can have multiple users with own set of privileges.
- GPS tracking device independence - it supports simultaneous tracking of devices from different vendors.
- Integration with custom devices - you can use template device to write your own code.
- Own web-page look and feel - match it with your company website.
- Mapping services - support for OpenLayers, OpenStreetMap, Google Maps, Microsoft Virtual Earth, and Mapstraction and ability to integrate with other mapping service providers.
- Reports - customize existing and build your own reports showing historical data for a vehicle or fleet.
- Geozones - provide arrival/departure events on reports.
- Any operating system - Java gives the system independency, Apache Tomcat provides web service and MySQL stores data.
- Localization - it is i18n compliant and supports easy localization (L10N) to languages other than English.
OpenGTS hosting on shared server with private JVM and Tomcat
Login via SSH to your account with us and test Java environment
java -version
 java version "1.6.0_45"
 Java(TM) SE Runtime Environment (build 1.6.0_45-b06)
 Java HotSpot(TM) 64-Bit Server VM (build 20.45-b01, mixed mode)
echo $JAVA_HOME
 /opt/jdk1.6.0_45
ant -version
 Apache Ant(TM) version 1.9.0 compiled on March 5 2013
echo $CATALINA_HOME
 /home/user/appservers/apache-tomcat-7.0.37
echo $ANT_HOME
 /opt/ant
Download and unpack OpenGTS
wget http://downloads.sourceforge.net/project/opengts/server-base/2.5.1/OpenGTS_2.5.1.zip
unzip OpenGTS_2.5.1.zip
Permanently set GTS_HOME environment variable for future use
sed -i '1iexport GTS_HOME=~/OpenGTS_2.5.1' .bashrc
source .bashrc
echo $GTS_HOME
Get MySQL JDBC and JavaMail jars
Download MySQL JDBC driver and JavaMail 1.4.x to $GTS_HOME/jlib/jdbc.mysql and $GTS_HOME/jlib/javamail respectively. We will use GTS_HOME/jlib subdirectories as our ext directory stub because on shared sever writing to $JAVA_HOME/jre/lib/ext is not possible. This change will require modification of a few management scripts where we will reset java.ext.dirs property. Note that JavaMail now (as of 1.5.x) ships as javax.mail.jar instead of mail.jar so using 1.5.x would require a few more changes.
# if you are going to use JavaMail 1.5 use the below (now commented) command
# wget -O $GTS_HOME/jlib/javamail/javax.mail.jar http://java.net/projects/javamail/downloads/download/javax.mail.jar
wget -O $GTS_HOME/jlib/javamail/mail.jar http://repo1.maven.org/maven2/javax/mail/mail/1.4.7/mail-1.4.7.jar
wget http://dev.mysql.com/get/Downloads/Connector-J/mysql-connector-java-5.1.29.tar.gz/from/http://cdn.mysql.com/
tar xzf mysql-connector-java-5.1.29.tar.gz mysql-connector-java-5.1.29/mysql-connector-java-5.1.29-bin.jar -O > $GTS_HOME/jlib/jdbc.mysql/mysql-connector-java-5.1.29-bin.jar
rm -f mysql-connector-java-5.1.29.tar.gz
Lets copy the jars to Tomcat's lib as the OpenGTS WAR will need them. It will also allow the JavaMail and JDBC driver to be available to all running Java code in the Tomcat environment. You need to restart Tomcat for it to see the new jars.
cp $GTS_HOME/jlib/*/*.jar $CATALINA_HOME/lib
jr
Compile and build JAR and WAR files
If you are going to use JavaMail 1.5 first correct the code looking for obsolete mail.jar to look for javax.mail.jar instead and not report errors. Just placing javax.mail.jar in ~/OpenGTS_2.5.1/jlib/javamail will not help as we might expect because build.xml contains reference to mail.jar. So the build.xml also needs to be modified for the 2 jars to be found.
cd $GTS_HOME
sed -i 's/\(mysql-connector-java\).*.jar/\1-5.1.29-bin.jar/' build.xml
# if you are going to use JavaMail 1.5 javax.mail.jar also run the below (now commented) commands
# sed -i 's/\(<include name="mail.jar"\/>\)/\1\n\t<include name="javax.mail.jar"\/>/' build.xml
# sed -i 's/"mail.jar"/"javax.mail.jar"/' src/org/opengts/tools/CheckInstall.java
ant all
...
all:
[echo] Build 'all' complete.
BUILD SUCCESSFUL
Total time: 15 seconds
For the subsequent scripts to run we need to modify java.ext.dirs as on shared server we cannot put jars into $JAVA_HOME/jre/ext/lib. We will set custom java.ext.dirs property in common.pl, common.sh and checkInstall.sh (that does not include any 'common' file).
sed -i.bak 's/\(CMD_JAVA="\${JAVA_HOME}\/bin\/java\) \$/\1 -Djava.ext.dirs=\$JAVA_HOME\/jre\/lib\/ext:\$GTS_HOME\/jlib\/javamail:\$GTS_HOME\/jlib\/jdbc.mysql \$/' bin/common.sh
sed -i.bak 's/\(\$cmd_java\) \$/\1 -Djava.ext.dirs=\$JAVA_HOME\/jre\/lib\/ext:\$GTS_HOME\/jlib\/javamail:\$GTS_HOME\/jlib\/jdbc.mysql \$/' bin/common.pl
sed -i.bak 's/\(CMD_JAVA="java\)/\1 -Djava.ext.dirs=\$JAVA_HOME\/jre\/lib\/ext:\$GTS_HOME\/jlib\/javamail:\$GTS_HOME\/jlib\/jdbc.mysql/' bin/checkInstall.sh
Update database credentials and mail system configuration
Create database, database user and assign user to the database with ALL privileges in cPanel. Then update OpenGTS_2.5.1/common.conf with the correct values as no root access is available on shared server. Update the below lines with proper values (use your hosting username_ prefix instead of user_) before executing them.
sed -i 's/ServiceAccount.db.name=.*/ServiceAccount.db.name=user_gts}/' $GTS_HOME/common.conf
sed -i 's/ServiceAccount.db.user=.*/ServiceAccount.db.user=user_gts}/' $GTS_HOME/common.conf
sed -i 's/ServiceAccount.db.pass=.*/ServiceAccount.db.pass=secret}/' $GTS_HOME/common.conf
Edit your mail account parameters in common.conf. These will be used for sending notifications. Note that it can be also done later in the runtime configuration file custom.conf. Track.war (or other/all WARs) will need to be rebuilt and redeployed.
sed -i 's/#smtp.host=.*/smtp.host=localhost/' $GTS_HOME/common.conf
sed -i 's/#smtp.user=.*/[email protected]/' $GTS_HOME/common.conf
sed -i 's/#smtp.user.emailAddress=.*/[email protected]/' $GTS_HOME/common.conf
sed -i 's/#smtp.password=password.*/smtp.password=password_for_above_user/' $GTS_HOME/common.conf
ant all
When making changes to confguration (and rebuilding, redeploying WARs) note that the default runtime configuration file is webapp.conf. It in turn includes common.conf. Common.conf includes custom.conf and system.conf. Do not forget to run ant all at the end of this step so that your database credentials are deployed to build directory and will then be consequently used by ant track and similar commands.
Initialize tables in the database
We will not use initdb.sh as we are on a shared host without root access. Instead we will only create the tables with dbAdmin.pl script. First lines of initdb.sh would create database and a database user with proper privileges. We already did it in cPanel.
bin/dbAdmin.pl -tables=ca
Version: 2.5.1
Validating table columns ...
Table 'Account' --- Creating table ...
...
Table 'Diagnostic' --- Creating table ...
Column validation completed successfully.
Updating GTS Version: 2.5.1
Updating DMTP Version: 1.3.6
You should now test your instance and also the mailing system with
bin/checkInstall.sh -sendMail [email protected]You can safely ignore Symbolic Link does not exist warning for /usr/local/gts, /usr/local/java and /usr/local/tomcat as it does not apply to shared server.
Load sample data into OpenGTS
Optionally you can load sample data. We recommend it unless you are expierienced OpenGTS user.
./sampleData/loadSampleData.sh
 Creating 'demo' Account ...
 Created Account-ID: demo
 Creating 'demo/demo' Device ...
 Created Device: demo/demo
 Creating 'demo/demo2' Device ...
 Created Device: demo/demo2
 Loading sample data ...
 Loading table: EventData ...
 Version: 2.5.1
 Loading table 'EventData' from file: ./sampleData/EventData.txt
 [WARN_|DBAdmin.execCommands:1242] **** Existing data WILL be overwritten! ****
 Column : accountID
 ...
 Column : cellNeighborInfo5 - will be dropped
 (Loaded 87 records from file './sampleData/EventData.txt' into table 'EventData')
Create sysadmin account
Choose a better password though :)
bin/admin.sh Account -account=sysadmin -pass=secret -create
Entry Point: org.opengts.db.tables.Account
Created Account-ID: sysadmin
You can edit an account later with
bin/admin.sh Account -account=sysadmin -editfor example to set Contact email.
Deploy track.war servlet
When running ant all all web apps have been already generated. Track application can be rebuilt with ant track after changes has been made to custom.conf, webapp.conf, system.conf or common.conf. Check OpenGTS Config Manual (links below) for custmization options, reports configuration, Private label Look & Feel settings and more. You can now deploy the app with any of the below commands (assuming Tomcat has auto deployment on):
cp build/track.war $CATALINA_HOME/webapps/
ant track.deploy
events.war can be deployed similarly.
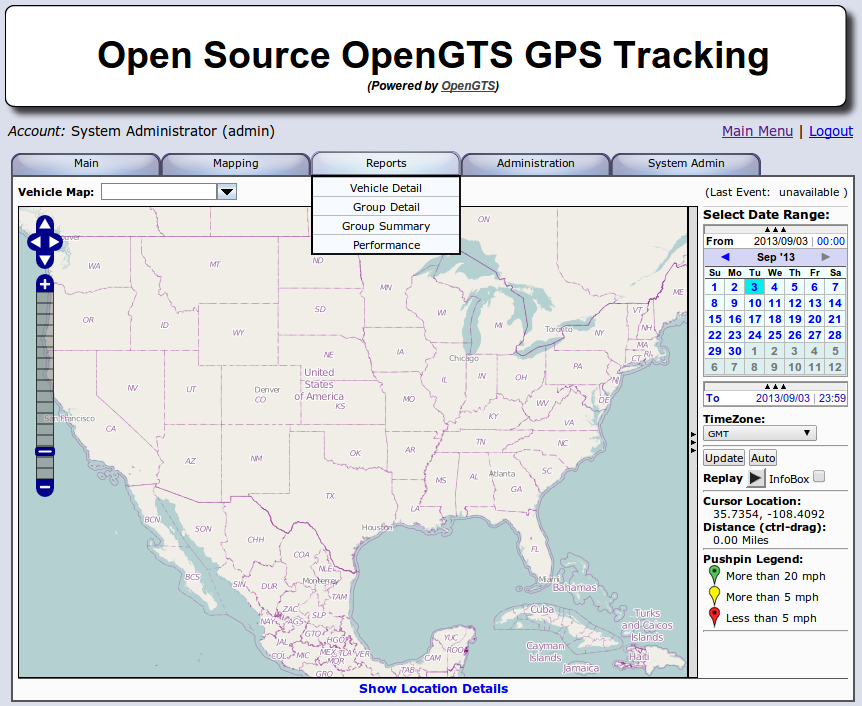
Access the web frontend - finally
Go to http://user.jvmhost.net/track/Track (or use your domain if set up)
Enter Account ID sysadmin Leave User ID blank Enter password as set earlier with admin.sh commmand
Here go 2 screenshots (Main Menu and Vehicle Maps) with the sample data loaded.

Testing OpenGTS with a Android phone as GPS device
Now at least we would like to have something real tracked - don't we? For the test we will use Android based smartphone and GPS2OpenGTS_Trial software. The trial runs for 60 minutes. In some circumstances you may need to go outdoor for GPS to determine your location. For Android you may use Google Maps and Find my location to determine if GPS works.
The data from a device can come via HTTP protocol, as raw TCP or UDP packets, SMSes or emails and contain NMEA GPRM string. We will use plain old HTTP for data collection. To achieve this we will use gprmc.war servlet to accept and process data sent by the device so there is no need to start a separate socket server (java process). In case you run 2 java processes on shared host (one for track.war and events.war and second for a standalone raw socket DCS service) additional fee may apply.
Track application configuration
- Login to track application as sysadmin
- Use System Admin - System Accounts to create new account acct with a password of your choice
- Logout and login as user acct
- In Administration - Vehicle Admin add new device dev. Optionally edit it and set Unique ID to dev.
- You should see your device location on the map in Mapping - Vehicle Map right after the first packet from your phone is sent in and accepted.
In the command line edit $GTS_HOME/webapp.conf. There is a section GPS2OpenGTS configuration there. Set or uncomment these 2 lines:
#gprmc.parm.account=acct
#gprmc.parm.device=dev
Rebuild and redeploy track and gprmc applications:
cd $GTS_HOME
ant track && ant track.deploy && ant gprmc && ant gprmc.deploy
Android phone configuration
After installing GPS2OpenGTS_Trial on your spartphone configure its settings:
- Server name: your domain or alias (username.jvmhost.net) or shared or dedicated IP of the server depending on your setup.
- Port Number: enter your Tomcat HTTP port here (you can find it in Java Control Panel - Ports). If you specified domain name (not IP) in 'Server name' you can also put port 80 here as it is proxied to Tomcat by default.
- User ID: acct
- Vehicle ID: dev
- Communication Mode: HTTP
- Enable GPS
- Logging Interval: 5
Start the application. It also has testing mode but note that the tester does not send real GPS data - you may find yourself in a middle of an ocean - anyway OK should be returned.
Debugging notes
For debugging purposes you may also try calling the URL with a browser or curl like:
http://username.jvmhost.net:YOUR_TOMCAT_HTTP_PORT/gprmc/Data?acct=acct&dev=dev&gprmc=$GPRMC,172413,A,3848.8028,N,08957.3521,W,0,000.0,171111,,*16Logs will be in $GTS_HOME/logs/w-gprmc.log.
If you have root access (for example deploying on a VPS) you may also capture data traffic with a tcpdump or tshark like:
tcpdump -i eth0 tcp port YOUR_TOMCAT_HTTP_PORTQuestions & Answers
Q: Email is not sent to the specified address, it gives me error when trying to send
A: Make sure you set correct email account to be used by OpenGTS. Create a mailbox in cPanel first if you have not done so or use third party mailbox like Gmail (SSL may need to be enabled). Then login to your account via SSH and run:
cd $GTS_HOME
bin/checkInstall.sh | grep SMTP
 (SMTP:<default>) ==> localhost:25 [[email protected], ssl=false, tls=false]
 (SMTP Connection) ==> Successful connection (does not guarantee service)
If you do not see your email above then you forgot to set it. In such case edit common.conf by running an editor:
mcedit $GTS_HOME/common.confand make sure the following lines are uncommented and contain correct values (the ones for your mailbox):
smtp.host=localhost
[email protected]
[email protected]
smtp.password=password_for_the_above_user
Retest mail sending with:
bin/checkInstall.sh -sendMail [email protected]Use your other email as recipent in above command. You should see success lines in the output for example:
(SMTP:<default>) ==> localhost:25
 [[email protected], ssl=false, tls=false]
(SMTP Connection) ==> Successful connection (does not guarantee service)
 Sending test email to '[email protected]' ...
 ... Test email successfully sent:
 From : [email protected]
 To : [email protected]
 Subject: CheckInstall test email [2.5.1]
 Body : CheckInstall test email sent successfully.
Q: When I try to run command: "bin/checkInstall -sendMail [email protected]" I get 4 warnings:
1) DCServer jar path is not in the current GTS_HOME path: tk10x
2) Symbolic Link does not exist: /usr/local/gts
3) Symbolic Link does not exist: /usr/local/java
4) Symbolic Link does not exist: /usr/local/tomcat
A: These are non-harmful generic warnings and you can safely ignore them.
The first one can be seen if another OpenGTS instance is running on the same server.
Q: I am not able to add user admin from sysadmin account. It showed me the account added but don't logged in and no data for that specific user is entered in the account table.
A: You can list existing users and devices with:
bin/admin.sh Account --listThese can be also seen in Track web application. Login as sysadmin and go to Administration - User Admin.
Q: I made changes in the webapp.conf file and rebuilt and redeployed track and gprmc but still not been able to receive any data using GPS2OpenGTS, it says Test[RX Send]null.
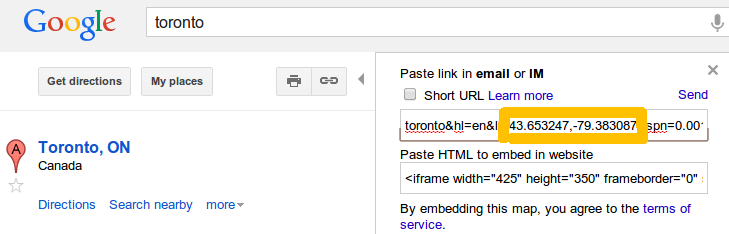
A: Before you go to GPS2OpenGTS tests first use manual tests and see what gets logged in logs/w-gprmc.log. Find a 2 places on Google Maps, let's say one in Chicago and one in Toronto. Zoom in Google Maps to a maximum and get decimal coordinates by clicking Link in the left panel. Take decimal latitude and longitude (the numbers following ll= parameter). In our case these are 43.653247,-79.383087.
Convert them to NMEA string with a converter like this http://opengts.budgetjava.com/cgi-bin/coordinates2nmea.pl. We got the following result:
/gprmc/Data?acct=sysadmin&dev=dev&gprmc=$GPRMC,083350,A,4339.1948,N,07922.9852,W,0,0,160514,,*4Similarily for the other place (Chicago) we got:
/gprmc/Data?acct=sysadmin&dev=dev&gprmc=$GPRMC,083520,A,4152.6875,N,08737.7872,W,0,0,160514,,*bNote the strings include current timestamp and verification code. You may generate new ones if you need different timestamps.
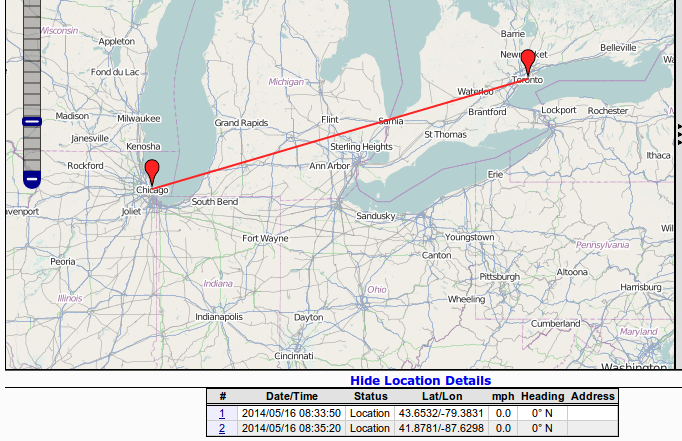
Now replace domain name with your domain and you can remove port. Update acct and dev parameters to existing ones. Then you can can call both strings and see your device moved quickly over the 700 kilometers (or 435 miles):
curl 'http://testingtrack.jvmhost.net/gprmc/Data?acct=sysadmin&dev=test&gprmc=$GPRMC,083350,A,4339.1948,N,07922.9852,W,0,0,160514,,*4'
curl 'http://testingtrack.jvmhost.net/gprmc/Data?acct=sysadmin&dev=test&gprmc=$GPRMC,083520,A,4152.6875,N,08737.7872,W,0,0,160514,,*b
The printed result shoud be OK. Alternatively you can call the URLs with your browser.
Go to Mapping - Vehicle Map and you should see both locations linked on the map below.
The log will show:
[INFO_|05/16 11:42:05|Transport.loadDeviceByTransportID:1666] Located Device 'sysadmin/test' (using default Device transport)and the called URL will be also there.
Q: When testing gprmc application I get java.lang.NullPointerException org.opengts.war.gprmc.Data._doWork(Data.java:1017) org.opengts.war.gprmc.Data.doGet(Data.java:874) javax.servlet.http.HttpServlet.service(HttpServlet.java:620) javax.servlet.http.HttpServlet.service(HttpServlet.java:727) and the database does not get updated.
A: In OpenGTS 2.5.5 - if you skip batt parameter then you will get the exception.
Quick grpmc test on a fresh OpenGTS 2.5.5 instance using batt (or alternatively one of batl, battl, battlevel) parameter:
- When logged in as sysadmin create a new account 'acct' under System Account. Set a new password for the account.
- Login as 'acct'
- Add device 'dev'
Edit webapps.conf in
$GTS_HOMEand uncomment the 2 lines#gprmc.parm.account=acct #gprmc.parm.device=devRun
cd $GTS_HOME && ant track && ant track.deploy && ant gprmc && ant gprmc.deployRun (update your host name in the URLs)
curl 'http://opengts.host/gprmc/Data?acct=acct&dev=dev&batt=0&gprmc=$GPRMC,083350,A,4339.1948,N,07922.9852,W,0,0,160514,,*4'
curl 'http://opengts.host/gprmc/Data?acct=acct&dev=dev&batt=0&gprmc=$GPRMC,083520,A,4152.6875,N,08737.7872,W,0,0,160514,,*b'
When being logged in as 'acct' check 'Mapping - Vehicle Map'
Final notes
A must reads for OpenGTS users are:
OpenGTS Conifg Manual
OpenGTS FAQ
Advanced configuration topics include GeoZones, SMS notifications (for example when a device is entering a GeoZone) via SMS gateway, email notfications, Google Maps API version 3 activation (includng hybrid, traffic, weather and Street View maps, reverse GeoCode service and interface customization.
OpenGTS hosting on a VPS server is quite similar and differences will be described in this article later.