Hosting JIRA can be easy no matter if you choose VPS, shared Java hosting with private Tomcat or a cloud. We describe and compare 3 methods of installing Atlassian JIRA on our servers.
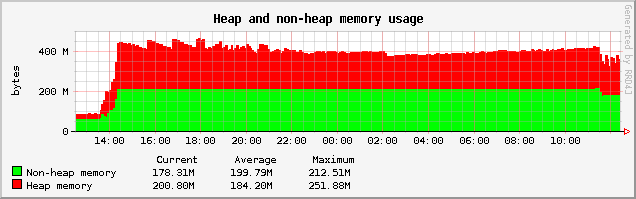
We specialize in Java hosting and JIRA hosting is only one of many Java applications hosted by our clients. Minimal installation will require Xen-768 package but this may only be suitable for testing. You can easily upgrade when your needs grow. For JIRA hosting on shared server (private JVM) you will need a custom package or Tomcat Plus package with heap extension. Contact us for quote. Idle JIRA (installed with WAR method) memory usage is shown below.
Installer method is fastest and recommended installation way for VPS. Tarball method allows for reusing existing Java environment (also for VPS) and WAR method allows for reusing existing Java/Tomcat environment e.g. on a shared hosting server with private Tomcat but requires some more manual configuration. We will show 2 methods. Installer method can also be automated and run unattended by preparing response.varfile file.
Prepare MySQL database for JIRA
If you have a VPS package then install mail server and MySQL server. We will use MySQL as our JIRA instance database. You could also use built in database for testing and upgrade to MySQL later but we are preparing production environment in this tutorial so will not bother with built-in database that is for testing only.
yum install mysql mysql-server postfix
service postfix start
chkconfig mysqld on && service mysqld start && mysql
mysql> CREATE DATABASE jiradb CHARACTER SET utf8 COLLATE utf8_bin;
mysql> GRANT ALL ON jiradb.* TO jirauser@localhost IDENTIFIED BY 'mypassword';
mysql> flush privileges; \q
If you have private Tomcat on shared server with cPanel then create your database, dbuser and mail account in cPanel. Your database and dbuser will have your hosting username prefix (username_dbmane, username_dbuser) in this case.
Run JIRA installer (method 1 for VPS)
JIRA hosting on VPS provides you with best security due to full isolation of your virtual server. The installer will quickly prepare working JIRA instance including JRE. This is the fastest method. Login to your VPS as root and run:
wget http://www.atlassian.com/software/jira/downloads/binary/atlassian-jira-6.0.6-x64.bin
sh atlassian-jira-6.0.6-x64.bin
Here is the output from the installer:
Unpacking JRE ...
Starting Installer ...
Aug 09, 2013 3:43:55 AM java.util.prefs.FileSystemPreferences$1 run
INFO: Created user preferences directory.
Aug 09, 2013 3:43:55 AM java.util.prefs.FileSystemPreferences$2 run
INFO: Created system preferences directory in java.home.

This will install JIRA 6.0.6 on your computer.
OK [o, Enter], Cancel [c]

Choose the appropriate installation or upgrade option.
Please choose one of the following:
Express Install (use default settings) [1], Custom Install (recommended for advanced users) [2, Enter], Upgrade an existing JIRA installation [3]
1
See where JIRA will be installed and the settings that will be used.
Installation Directory: /opt/atlassian/jira
Home Directory: /var/atlassian/application-data/jira
HTTP Port: 8080
RMI Port: 8005
Install as service: Yes
Install [i, Enter], Exit [e]

Extracting files ...

Please wait a few moments while JIRA starts up.
Launching JIRA ...
Installation of JIRA 6.0.6 is complete
Your installation of JIRA 6.0.6 is now ready and can be accessed via your
browser.
JIRA 6.0.6 can be accessed at http://localhost:8080
Finishing installation ...
You can then access it with a domain, alias or IP for example http://jira.jvmhost.net:8080/ and run the Setup Wizard. Here are a few screenshots.
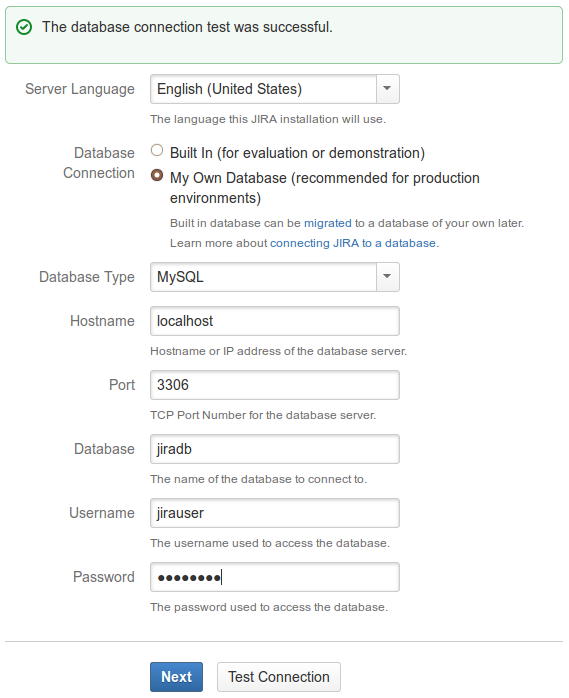
Choose My Own Database, fill in hostname with localhost and Database, Username and Password fields with the values you set in previous step. After seletcing MySQL as database type you may get warning about missing JDBC driver (as it is not bundled with JIRA like PostgreSQL does) and instructions on how to install it. The jar needs to go to lib directory of your JIRA installation. After adding the driver (jar) you will need to restart JIRA. Download the driver from MySQL site and run:
cp /path/to/mysql-connector-java-5.1.15-bin.jar /opt/atlassian/jira/lib
cd /opt/atlassian/jira/bin/
./stop-jira.sh
./start-jira.sh
Now, when you refresh the JIRA Wizard page the warning should be gone. You should also test MySQL connection.
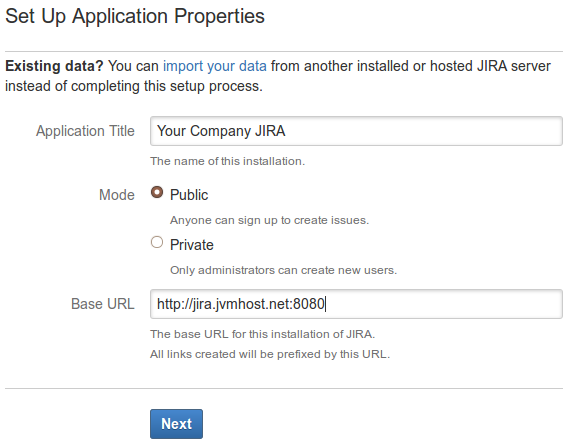
Enter your base URL. If you want to skip the port (8080 by default) your can do so but do not forget to also redirect port 80 to 8080 with iptables in /etc/rc.local. This way you will not change anything in Tomcat configuration but get a nicer URL.
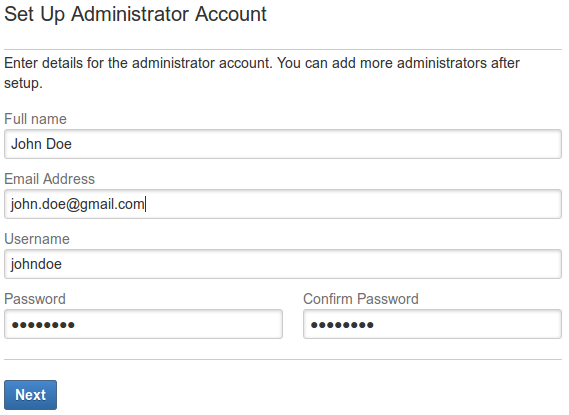
Your will login to JIRA with the administator account you set up in this step.
JIRA licenses are paid (currently - Aug 2013 - the cheapest is $10 for up to 10 users a month). You may also get free monthly trial license. If you do not have a license please register on https://id.atlassian.com/id/login.action then enter your Atlassian username and password in the next step. Your trial license will be automatically generated.
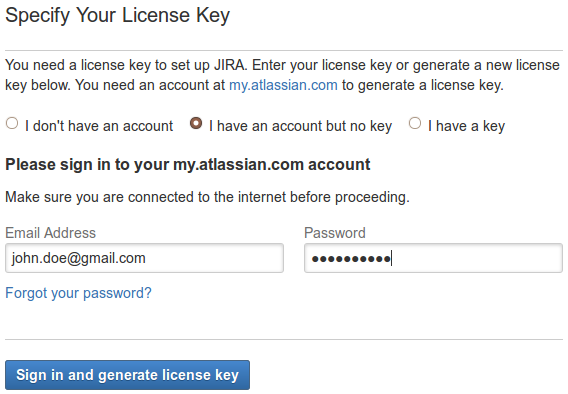
If you choose I don't have and account you will be able to register directly from the Wizard and the license will be generated too.
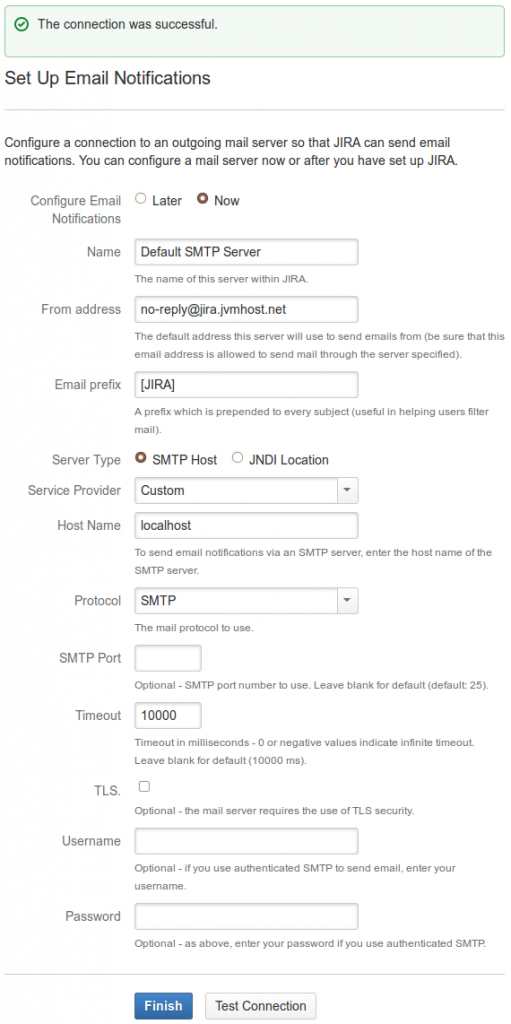
In last step configure mail server so that JIRA could communicate with you. In case of VPS the local dedciated mail server will be used as installed previously. In case of shared Java hosting the shared mail server of your Java host will be used. At any time you can also switch to third party mail server like Google Apps.
Install JIRA with Tarball (on VPS systems where JDK/JRE already exists)
This method assumes there is JDK or JRE already installed on the system. Jira gets unpacked to a home directory of a dedciated user and JAVA_HOME, JIRA_HOME and jira.home variables are manually updated like in previous method. Then you start it as the dedicated user and follow the Wizard. See documentation for more details.
Setup JIRA WAR on working Tomcat installation (e.g. on shared server with private tomcat)
JIRA hosting on a shared server with dedicated JVM provides you with all the features of cPanel environment including mail server and MySQL server. To get JIRA installed on your Tomcat account you can request it from support or follow this guide if you prefer to do it by yourself. We assume you already have your Tomcat heap increased to a 512 or more MB by support. Login to your JVMHost account with SSH and run (replace your hosting username and Tomcat version accordingly):
cd ~/appservers/apache-tomcat-7.0.37/lib
wget http://www.atlassian.com/software/jira/downloads/binary/jira-jars-tomcat-distribution-6.1-m04-tomcat-7x.zip
unzip jira-jars-tomcat-distribution-6.1-m04-tomcat-7x.zip
rm jira-jars-tomcat-distribution-6.1-m04-tomcat-7x.zip
cp /opt/mysql-connector-java-5.1.15-bin.jar .
As an alternative to the last command above you could bundle the jar within JIRA WAR by running:
mkdir ~/atlassian-jira-6.0.6-war/edit-webapp/WEB-INF/lib
cp /opt/mysql-connector-java-5.1.15-bin.jar ~/atlassian-jira-6.0.6-war/edit-webapp/WEB-INF/lib
Install additional libs/jars in Tomcat's lib and from webapp directory remove the libs that are already in Tomcat's lib directory:
wget http://www.atlassian.com/software/jira/downloads/binary/atlassian-jira-6.0.6-war.tar.gz
tar xzf atlassian-jira-6.0.6-war.tar.gz
cd ~/atlassian-jira-6.0.6-war/webapp/WEB-INF/lib
rm -f jcl-over-slf4j-*.jar jul-to-slf4j-*.jar log4j-*.jar slf4j-api-*.jar slf4j-log4j12-*.jar
You may now customize JIRA's webapp directory content by copying files from webapp/path/to/file subdirectory to the edit-webapp/path/to/file and modifying file in edit-webapp. The edit-webapp version will be used instead of the webapp's one when building WAR.
Replace username with your hosting username and create custom jira-application.properties with correct jira.home Java variable.
cd ~/atlassian-jira-6.0.6-war
cp -f webapp/WEB-INF/classes/jira-application.properties edit-webapp/WEB-INF/classes
sed -i 's/jira.home =.*$/jira.home = \/home\/username\/appservers\/apache-tomcat-7.0.37\/webapps\/jira/' edit-webapp/WEB-INF/classes/jira-application.properties
Set absolute path to your JIRA in shell resource file .bashrc
sed -i '2 i export JIRA_HOME=\/home\/username\/appservers\/apache-tomcat-7.0.37\/webapps\/jira' ~/.bashrcNow being in the atlassian-jira directory build WAR by running:
./build.sh
Buildfile: build.xml

init:

clean:

compile:
Created dir: /home/username/atlassian-jira-6.0.6-war/tmp/build/war
Created dir: /home/username/atlassian-jira-6.0.6-war/dist-generic
Created dir: /home/username/atlassian-jira-6.0.6-war/dist-tomcat
Created dir: /home/username/atlassian-jira-6.0.6-war/dist-tomcat/tomcat-6
Copying 8993 files to /home/username/atlassian-jira-6.0.6-war/tmp/build/war
Copying 2 files to /home/username/atlassian-jira-6.0.6-war/tmp/build/war

war:
Building jar: /home/username/atlassian-jira-6.0.6-war/dist-generic/atlassian-jira-6.0.6.war
Building jar: /home/username/atlassian-jira-6.0.6-war/dist-tomcat/atlassian-jira-6.0.6.war
Building jar: /home/username/atlassian-jira-6.0.6-war/dist-tomcat/tomcat-6/atlassian-jira-6.0.6.war
Copying 1 file to /home/username/atlassian-jira-6.0.6-war/dist-tomcat/tomcat-4
Copying 1 file to /home/username/atlassian-jira-6.0.6-war/dist-tomcat/tomcat-5
Copying 1 file to /home/username/atlassian-jira-6.0.6-war/dist-tomcat/tomcat-5.5
Copying 1 file to /home/username/atlassian-jira-6.0.6-war/dist-tomcat/tomcat-6

--------------------------------------------------
Deployable WARs generated:

TOMCAT: /home/username/atlassian-jira-6.0.6-war/dist-tomcat/atlassian-jira-6.0.6.war
GENERIC: /home/username/atlassian-jira-6.0.6-war/dist-generic/atlassian-jira-6.0.6.war


See http://www.atlassian.com/software/jira/docs/latest/servers/ for install instructions
--------------------------------------------------


BUILD SUCCESSFULjira.xml
Total time: 43 seconds
Define Context for JIRA with:
cp ~/atlassian-jira-6.0.6-war/dist-tomcat/tomcat-6/jira.xml ~/appservers/apache-tomcat-7.0.37/conf/Catalina/localhostSet mail related properties to comply with RFC 2231 mail clients.
sed -i '2 i export CATALINA_OPTS="$CATALINA_OPTS -Dorg.apache.jasper.runtime.BodyContentImpl.LIMIT_BUFFER=true -Dmail.mime.decodeparameters=true"' ~/appservers/apache-tomcat-7.0.37/bin/catalina.sh Your Heap limit will already be set correctly by JVMHost support to at least 512MB.
To have JIRA handle UTF-8 properly make sure URIEncoding="UTF-8" is set for AJP, HTTP (and optionally HTTPS) connectors in server.xml. See also this article.
Access Wizard at http://username.jvmhost.net/jira. Create database, database user and assign one to the other with ALL prvileges in cPanel. Use them in the Wizard. The Wizard steps are the same as above.
To have your JIRA available at root URL instead of /jira path
- stop Tomcat
- remove
webapps/ROOT - rename
jira.xmltoROOT.xml - and update
ROOT.xmlreplacingpath="/jira"withpath="" - start Tomcat
For more information about JIRA hosting offer contact our support.
For more information on getting started with JIRA, see the JIRA 101 guide.
Detailed information on using and administering JIRA can be found in the rest of the JIRA documentation:
JIRA User's Guide
JIRA Administrator's Guide
JIRA Performance Tuning